
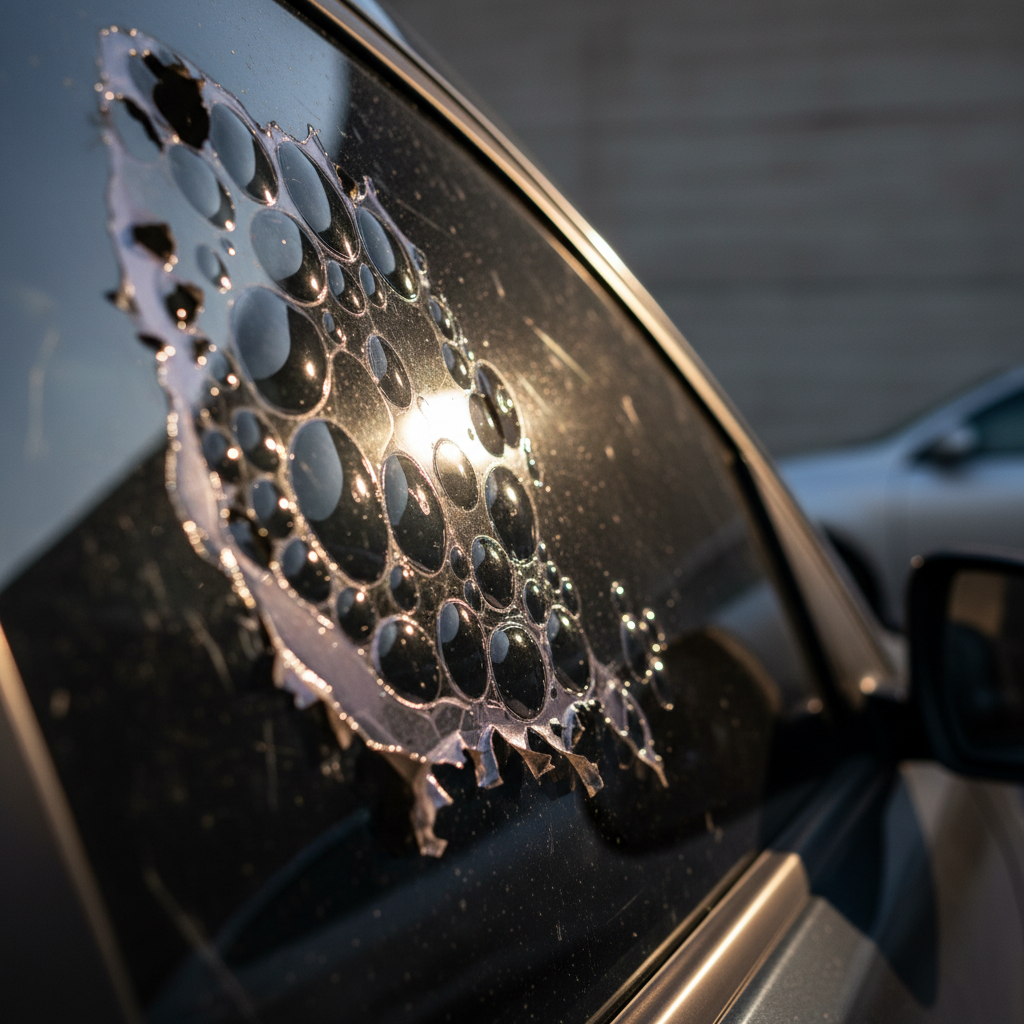
Top 5 Window Tint Problems and How to Avoid Them
Window tinting is one of the smartest investments a San Diego vehicle owner can make. Quality tint blocks up to 99% of UV radiation, dramatically reduces interior heat buildup during the city's 260+ sunny days per year, improves privacy, and gives any vehicle a cleaner, more finished appearance. When done right, it's a set-and-forget upgrade that quietly delivers for years.
The problem is that not all tint is done right. Low-quality materials, shortcuts in installation, and poor aftercare all create issues that range from cosmetically frustrating to genuinely affecting driver safety. And in San Diego's intense UV environment, these problems tend to surface faster than they would in milder climates.
Whether you're considering window tint for the first time or dealing with a failing installation, this guide covers the five most common window tint problems we encounter — what causes them, how to spot them early, and exactly what separates a long-lasting professional installation from one that starts failing within months.
Why Window Tint Problems Happen
The vast majority of window tint failures share a common origin: either the wrong materials were used, the installation was done incorrectly, or the film was not maintained properly afterward. In San Diego specifically, UV intensity and heat accelerate every one of these failure modes — problems that might take five years to appear in a cooler climate can surface in half the time here.
Low-Quality Film
Budget dyed films use inferior adhesives and lack UV stabilizers, making them prone to discoloration, adhesive failure, and premature peeling — particularly in high-UV environments like San Diego.
Poor Installation Technique
Inadequate glass preparation, contamination beneath the film during application, or improper squeegee technique all create immediate or latent installation defects that worsen over time.
DIY Application Mistakes
Window tint installation requires experience, proper tools, and controlled conditions. DIY attempts most commonly result in trapped air bubbles, visible seams, misaligned edges, and premature adhesive failure.
Improper Aftercare
Using ammonia-based cleaners, abrasive cloths, or rolling windows down too soon after installation can all damage the film or disrupt the adhesive cure — causing problems that emerge weeks or months later.
Window Tint Peeling
Peeling is one of the most visible and frustrating window tint failures — and one of the most preventable. It occurs when the adhesive bond between the film and the glass breaks down, causing the edges or corners of the film to lift away from the surface and curl back.
Common Causes of Peeling
- Low-quality adhesive formulations that degrade quickly under UV and heat exposure
- Glass surface not properly cleaned and decontaminated before application — oil, residue, or moisture trapped beneath the film from day one
- Ammonia-based cleaning products used after installation, which chemically break down the adhesive layer over time
- Rolling windows down during the curing period (typically 3–7 days post-installation), disrupting the adhesive bond before it has fully set
- Aging film that has reached the end of its designed lifespan, particularly in San Diego's accelerated UV environment
Warning signs: Lifting at corner edges or along the top edge of the glass, visible separation between the film and the glass surface, or a film edge that moves when touched.
Prevention: Professional installation on properly prepared glass using premium film with quality adhesive, combined with ammonia-free aftercare products and patience during the curing window, eliminates the primary causes of peeling for years. Once peeling begins, the film should be fully removed and replaced — re-adhering a peeling edge never produces a lasting result.
Window Tint Bubbling
Bubbles in window tint are a clear sign that something went wrong — either during installation or as the film ages. Small air pockets trapped beneath the film catch light from inside the vehicle and create a distorted, unprofessional appearance that tends to worsen with time as the adhesive continues to fail.
Installation-Related Bubbles
Appear shortly after installation. Caused by air or moisture trapped during application — typically from improper squeegee technique, insufficient slip solution, or debris on the glass surface. Small water bubbles that disappear within 2–4 weeks during the curing process are normal and expected. Persistent bubbles are not.
Adhesive Failure Bubbles
Develop months or years after installation. Caused by the adhesive layer breaking down due to UV degradation, heat cycling, or chemical exposure from improper cleaning products. Once this process begins, bubbling spreads progressively — there is no effective way to stop it short of replacing the film.
Warning signs: Visible air pockets of any size that persist beyond the standard 2–4 week curing period, clusters of small bubbles near the edges of panels, or large singular bubbles appearing on older tint.
How professionals prevent it: A thorough glass cleaning and decontamination sequence before any film touches the surface, controlled application technique with appropriate slip solution, and methodical squeegee work from the center outward eliminates air entrapment. Premium films with higher-quality adhesive formulations are also significantly more resistant to adhesive-breakdown bubbling over time.
Tint Discoloration and Purple Tint
Purple or reddish discoloration is one of the most reliable visual indicators of low-quality window film — and one of the clearest signs that a window tint replacement is overdue. It's caused by UV-induced dye degradation in budget dyed films, where the carbon-black or neutral pigments used to achieve the tint's dark appearance break down under prolonged sun exposure and shift toward a purple or brownish hue.
In San Diego, where UV index levels regularly reach "Extreme" during summer months, this degradation process happens faster than in most other U.S. cities. Films that might last four or five years before discoloring in Seattle or Portland can start showing color shift within two to three years here.
Signs of Failing Tint Color
- Windows appear purplish or brownish rather than their original dark neutral tone
- Noticeable color difference between windows tinted at the same time
- Film appears faded and lighter than when originally installed
- Uneven color across a single window panel
The solution: Premium ceramic and carbon films contain no dye — their color comes from the film's construction rather than added pigment. Without dye to degrade, ceramic and carbon films maintain their original color for the full lifespan of the product. This is one of the most compelling practical reasons to invest in ceramic tint upfront rather than replacing a discolored budget film in two or three years.
Experiencing tint problems on your San Diego vehicle? SD Auto Style provides professional tint removal, replacement, and premium ceramic upgrades.
Gaps and Uneven Edges
Gaps between the film edge and the window frame — or uneven, jagged edges visible from inside the vehicle — are the calling card of a poorly executed installation. They happen when film is cut freehand without precise vehicle-specific patterns, when the installer lacks the experience to handle complex curved glass geometries, or when DIY attempts run into the practical difficulty of cutting film to fit accurately in an installed position.
Beyond the appearance issue, gaps along the edges create entry points for moisture and debris to work underneath the film — accelerating both peeling and the kind of adhesive bubbling described earlier. A gap that starts small tends to grow as the exposed edge lifts progressively outward.
Why Professional Cutting Matters
At SD Auto Style, window film is cut using computer-aided pattern software that generates exact templates for each specific vehicle year, make, and model — accounting for the precise curvature and dimensions of every glass panel. This eliminates the guesswork and the uneven edges that result from manual or freehand cutting, and ensures the film reaches as close to the door frame edge as possible without creating lift-prone overlaps.
Prevention: Always choose an installer who uses plotted vehicle-specific patterns rather than hand-cutting film on the glass. Ask specifically about the cutting method before booking any window tint installation.
Poor Visibility and Optical Distortion
Window tint should be invisible in its effect on visual clarity — you should see through a tinted window just as clearly as an untinted one, simply with reduced brightness. When tint introduces haze, waviness, or optical distortion, it's both a cosmetic problem and a legitimate driving safety concern.
Distortion in window tint comes from several sources: low-quality films with inconsistent thickness or impure optical coatings, film that was improperly heated and stretched during installation on curved glass, bubbles or moisture beneath the surface that refract light unevenly, or metalized films with aggressive light-altering properties. In all cases, the result is a film that actively compromises the driver's view rather than simply filtering light.
Safety note: Optical distortion in side windows, rear windows, or mirrors directly affects a driver's ability to accurately judge distances and detect hazards — particularly when checking blind spots, changing lanes, or reversing. This is not a cosmetic inconvenience; it is a genuine safety issue that warrants immediate replacement.
Premium ceramic films are manufactured to optical-grade standards with highly consistent thickness and clarity. When professionally installed on properly prepared glass without contamination beneath the surface, they are optically indistinguishable from clear glass — just darker.
DIY Window Tint vs. Professional Installation
DIY window tint kits are widely available and superficially appealing — they're inexpensive and seem straightforward. In practice, professional-grade window tint installation requires controlled conditions, vehicle-specific cutting patterns, and hands-on technique that takes experience to execute correctly. The gap in results is consistent and significant.
| Factor | DIY | Professional |
|---|---|---|
| Film Quality | Consumer-grade, budget films | Premium ceramic or specialty film |
| Cutting Method | Hand-cut, freehand | Computer plotted, vehicle-specific |
| Bubble Risk | High — common outcome | Minimal — proper technique |
| Edge Accuracy | Often gapped or uneven | Clean, precise edge placement |
| Durability | 2–3 years average | 7–10+ years |
| Warranty | None | Manufacturer + installer warranty |
| Legal Compliance | No verification | Verified before installation |
| Optical Clarity | Prone to distortion | Optical-grade clarity |
The cost of a DIY kit frequently approaches the price of a professional installation when you account for wasted film from mistakes, the tools required, and the time involved. When the result still fails within a year or two and requires professional removal and replacement, the total cost exceeds what a quality professional installation would have cost from the start.
How to Prevent Window Tint Problems
Choose High-Quality Window Film
The single most important decision in any window tint project is the film itself. Premium ceramic films manufactured by reputable brands offer superior UV resistance, infrared heat rejection, optical clarity, and adhesive stability compared to budget dyed films. They don't discolor, they maintain their performance properties for the full lifespan of the installation, and they make every other aspect of the installation easier to execute correctly.
In San Diego's high-UV climate, the performance gap between ceramic and budget dyed films is particularly pronounced. The additional upfront investment in a quality film pays for itself repeatedly over the installation's lifetime.
Hire Experienced Installers
Window tint installation is a skilled trade. An experienced installer brings not only the correct technique but also the judgment to recognize when glass preparation isn't adequate, when conditions aren't right for installation, or when a particular panel needs special handling. This experience is what separates a perfectly bubble-free, edge-aligned installation from one that starts showing problems within months.
At SD Auto Style, every window tint installation follows a structured preparation and application protocol — thorough glass cleaning, chemical decontamination, vehicle-specific pattern cutting, and methodical application in a controlled environment. This process is the foundation of every long-lasting installation we produce.
Maintain Your Tint Properly
- Wait the full curing period (typically 3–7 days) before rolling windows down or cleaning the tinted glass
- Use only pH-neutral, ammonia-free window cleaners — household glass cleaners containing ammonia degrade the film over time
- Clean with a soft microfiber cloth using gentle pressure — no abrasive pads or rough towels
- Spray cleaner onto the cloth rather than directly onto the tinted glass surface
- Inspect the film periodically for early signs of edge lifting, bubbling, or color change and address them promptly
Follow California Tint Laws
Compliance with California's VLT requirements isn't just about avoiding tickets — it's also about safety. The 70% VLT minimum on front side windows exists to ensure drivers maintain adequate visibility in all conditions. Installing illegally dark tint on front windows compromises nighttime visibility, peripheral sight lines, and the driver's ability to be seen clearly by other road users.
At SD Auto Style, we verify legal compliance for every California-registered vehicle before any film is applied. Every installation we perform meets current state regulations — protecting our customers from both legal and safety consequences.
Disclaimer: Window tint regulations may change. Always verify current California tint laws before installation.
When Should You Replace Your Window Tint?
Even a quality window tint installation has a finite lifespan. Knowing when to replace rather than tolerate a failing installation saves you from progressively worsening visibility, aesthetics, and protection. Look for these signs:
Persistent bubbling
Air or adhesive failure bubbles that don't disappear within the standard 2–4 week curing window — or that appear on an older installation
Peeling edges or corners
Any area where the film has begun to lift away from the glass surface and cannot be pressed flat permanently
Purple or brown discoloration
Color shift from the film's original neutral dark tone — a clear indicator of UV dye degradation in low-quality film
Visible optical distortion
Haze, waviness, or refraction visible through the tinted glass that wasn't present when the film was new
Edge cracking or brittleness
Edges that appear cracked, stiff, or are flaking — a sign the film has passed the end of its structural lifespan
Significant fading
Film that is noticeably lighter than when installed, indicating the tint's UV blocking and heat rejection properties have also degraded
Why Ceramic Tint Is Worth the Investment
After reviewing the five most common window tint problems, a pattern emerges: most of them are either caused by or significantly worsened by low-quality film. Ceramic tint resolves the majority of these issues at the source.
Superior Heat Rejection
Ceramic films block infrared radiation — the primary source of solar heat — independently of the film's visible darkness. A 70% ceramic tint rejects far more heat than a 70% standard film, which matters significantly for legally compliant front windows in California.
No Dye to Degrade
Ceramic and carbon films contain no UV-sensitive dye. Their color comes from the film's construction — nano-ceramic particles — which don't shift under UV exposure. Purple discoloration is simply not possible with quality ceramic film.
Superior Adhesive Stability
Premium ceramic films use higher-grade adhesive formulations engineered for long-term performance under heat and UV cycling. Peeling and premature adhesive failure are significantly less common compared to budget film categories.
Optical-Grade Clarity
The manufacturing standards for ceramic film result in consistent thickness, no metallic haze, and exceptional optical clarity. Distortion is a non-issue with properly installed ceramic film.
Proven Long-Term Durability
Professional ceramic tint routinely achieves 7 to 10 years or more in San Diego's demanding climate — two to three times the lifespan of budget dyed alternatives — making the higher upfront cost a sound long-term investment.
The Right Tint, Done Right, Lasts
Every window tint problem covered in this guide — peeling, bubbling, discoloration, gaps, distortion — is either preventable entirely or dramatically reduced by two decisions: choosing the right film, and having it installed by an experienced professional using proper preparation and technique.
In San Diego, where vehicles spend more time in intense UV and solar heat than almost anywhere else in the country, the quality of your window tint film and installation matters more than it would in a milder climate. Budget films and inexperienced installation aren't just aesthetic risks — they're economic ones, when you account for early replacement costs.
Invest in quality ceramic film, maintain it with the right products, and have it installed by professionals who use proper preparation and precision cutting. Done correctly, your window tint will deliver everything it promises for the better part of a decade.
Professional Window Tint in San Diego
SD Auto Style provides professional window tint installation, tint removal, and ceramic tint upgrades for all vehicle types in San Diego. Every installation uses premium film, precision cutting, and verified California compliance.
367 15th St, San Diego, CA 92101 · (619) 354-0464
Window Tint Problem FAQs
Answers to the most common questions about window tint issues, repair, and replacement in San Diego.